
React Native Application Development: MVP to App Store


Building a mobile app is not hard, shipping a mobile app that survives real users, store review, and weekly iteration is where most teams get surprised.
React Native is one of the most pragmatic ways to go from idea to production because you can share code across iOS and Android, keep a web-like delivery pace, and still reach native capabilities when you need them. The catch is that “MVP” in mobile is not just “fewer features.” It is a small, end-to-end product slice that includes builds, signing, crash reporting, store metadata, privacy declarations, and a reversible release plan.
What “MVP to App Store” means in React Native
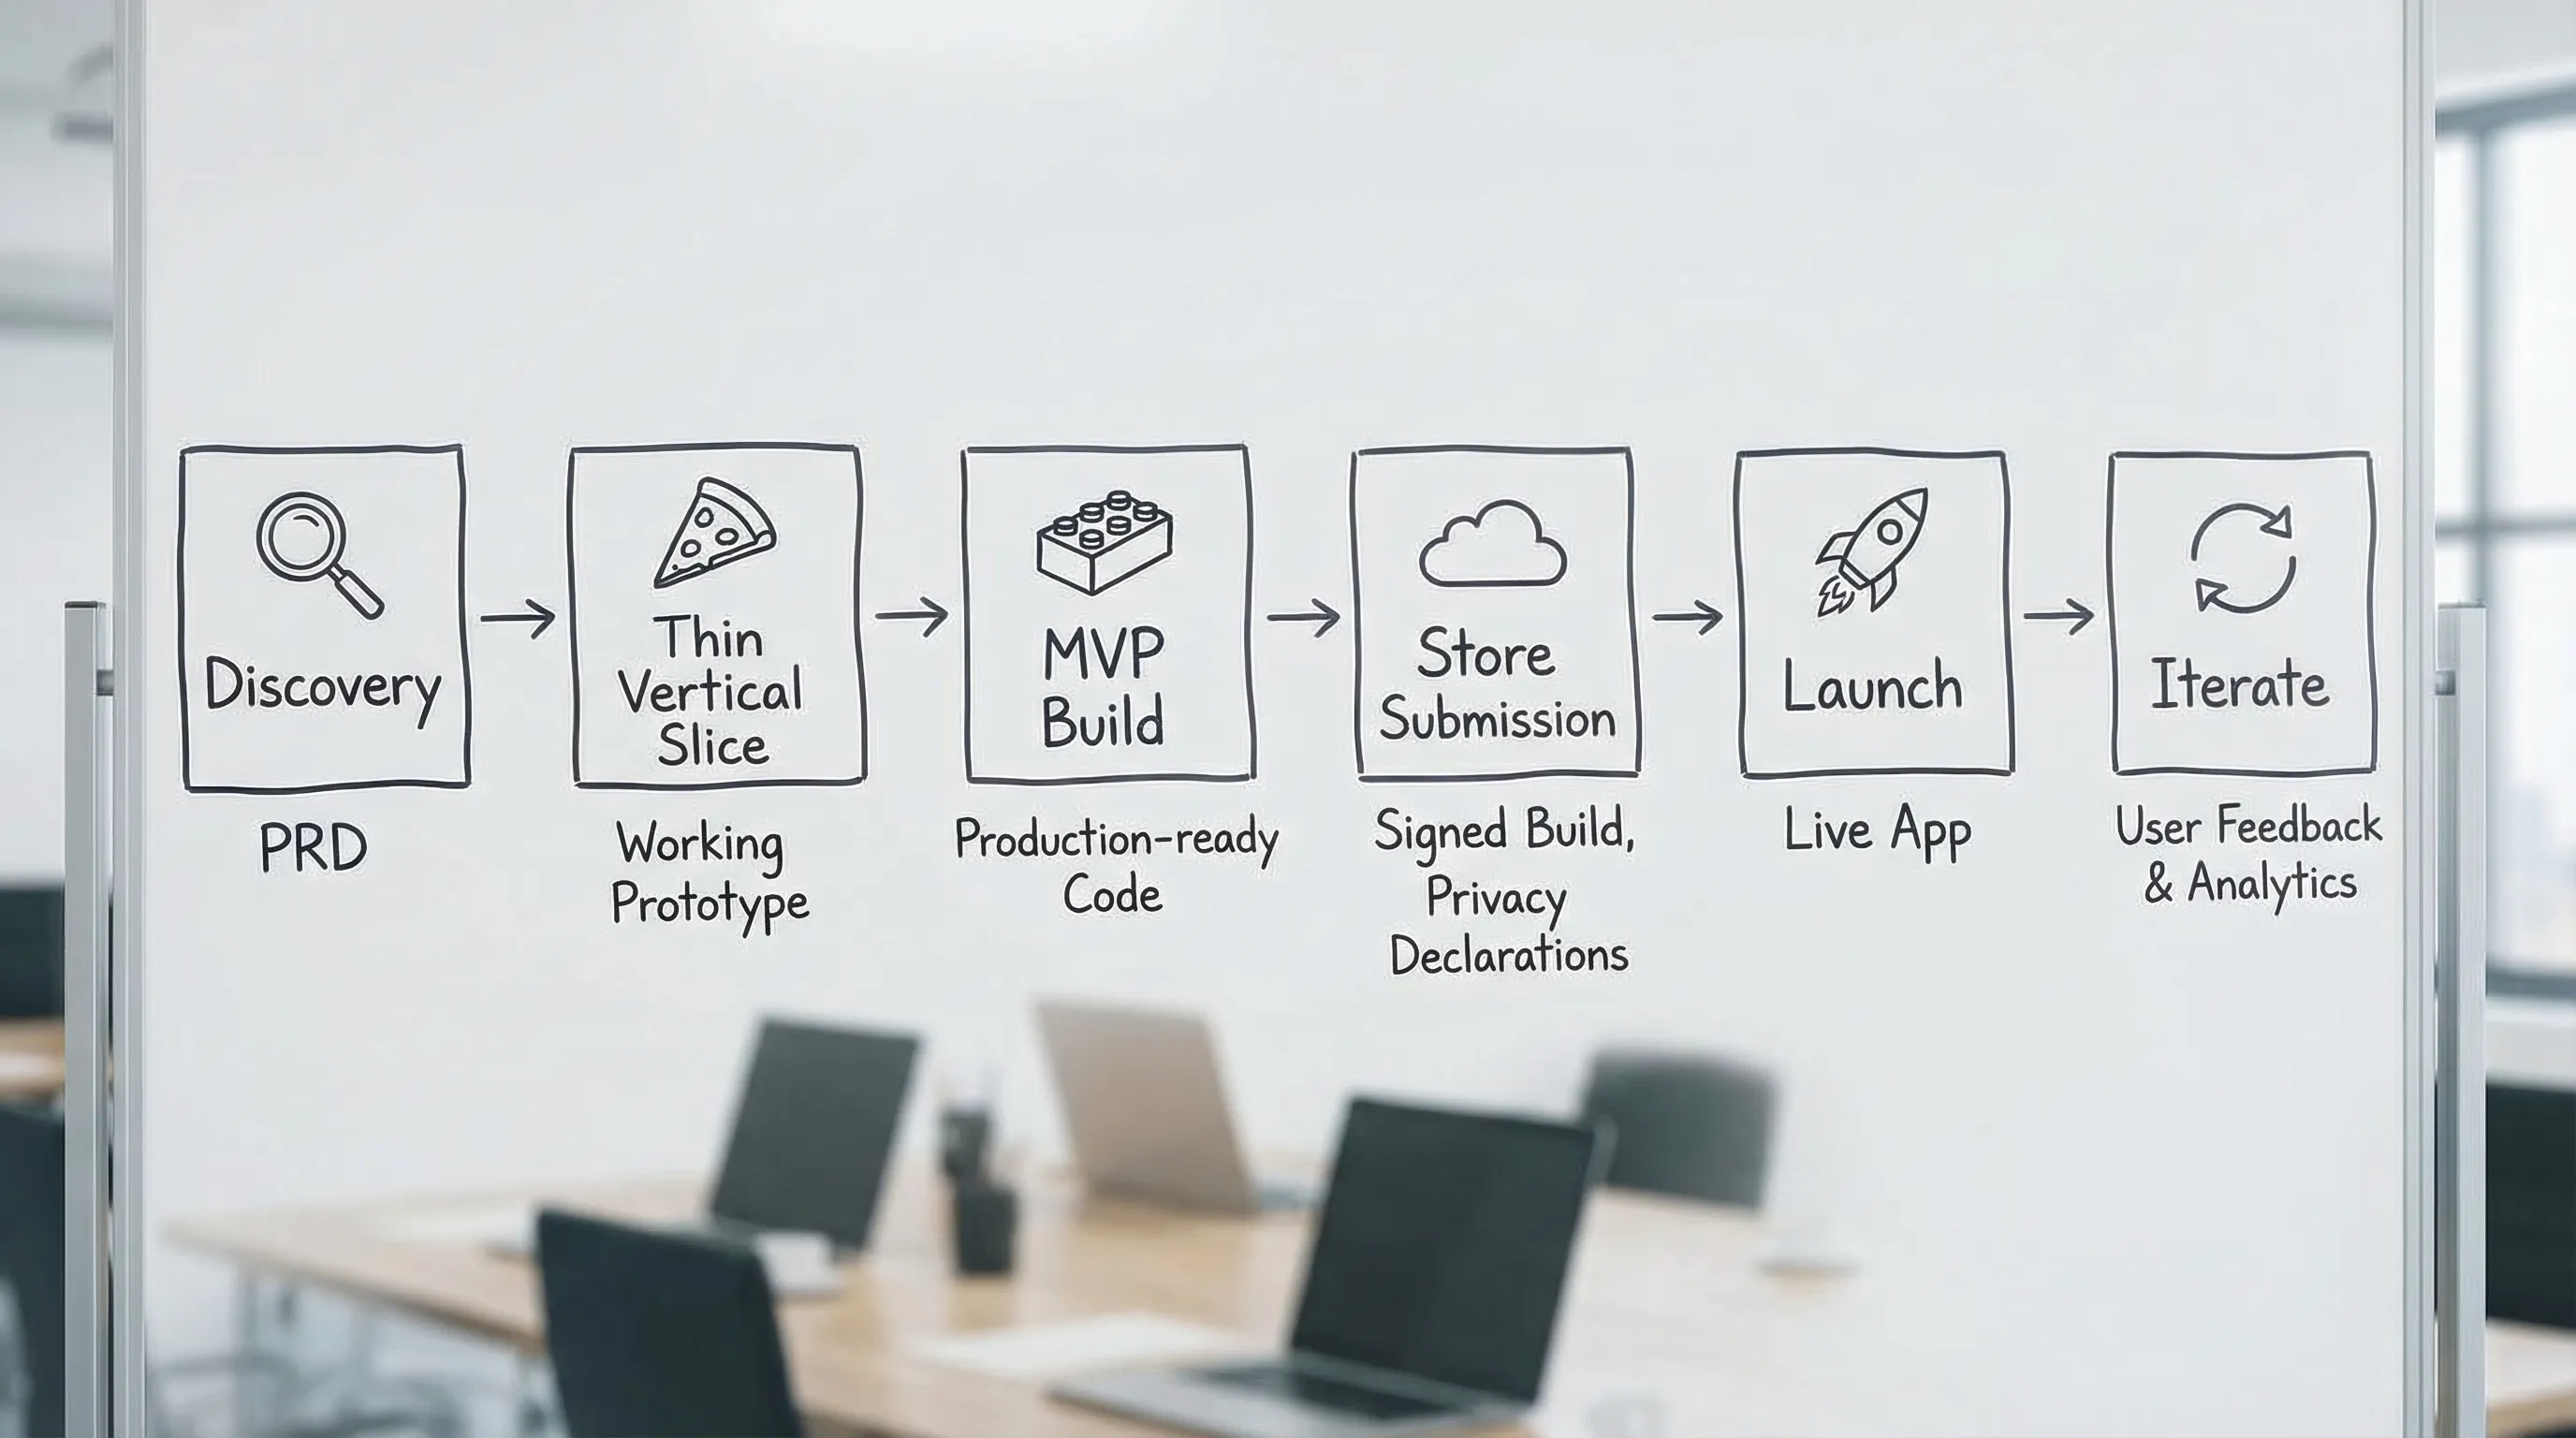
In practice, React Native application development from MVP to App Store means you are proving four things, in order:
- Value: users can complete the core job in under a minute, without help.
- Viability: the business can measure and monetize or otherwise justify the workflow.
- Operability: you can ship updates safely, monitor failures, and recover quickly.
- Compliance: you pass App Store and Google Play policy checks without last-minute redesigns.
If you only build screens, you do not have an MVP, you have a prototype. An MVP ships through the same pipeline your “real product” will use.
Wolf-Tech often recommends approaching this as a thin vertical slice first (a single, fully working journey), then expanding to MVP breadth. If you want the general roadmap framing, their broader guide on staged delivery is helpful: Development Application Roadmap: From MVP to Scale.
Step 1: Pick the right React Native workflow (Expo vs bare)
Your first architecture decision is not Redux vs Zustand, it is whether you want a managed workflow or full native control.
React Native itself is the framework (React Native docs), but most teams choose between:
- Expo (managed or “prebuild”): faster start, smoother build tooling, and a strong default path for OTA updates.
- Bare React Native: full control over iOS and Android projects from day one, often preferred when you know you will need deeper native work or you are integrating into existing native apps.
This is not a religious choice. It is a risk choice.
| Decision factor | Expo workflow tends to fit when | Bare React Native tends to fit when |
|---|---|---|
| Speed to first production build | You want to ship an MVP fast with minimal native churn | You already have native build discipline and templates |
| Native modules | You can live with common modules and a controlled set of custom native work | You expect frequent custom native modules and platform-specific behavior |
| OTA updates strategy | You want a clean path for JS updates (still respecting store rules) | You prefer store-only releases, or you want total control over update mechanics |
| Team skills | Your team is strongest in TypeScript/React, not Xcode/Gradle | You have strong iOS/Android engineers available |
If you choose Expo, use its official documentation for current capabilities and constraints: Expo docs. In 2026, Expo is a common default for MVPs, but you should still validate any “must-have” capability early (camera, background tasks, Bluetooth, deep links, payments) with a thin slice.
Step 2: Define an MVP that fits mobile reality
Mobile MVP scope needs to account for things web teams often postpone:
- Devices are slow, networks are flaky, and backgrounding is normal.
- Permissions are user-visible (push, location, camera).
- Store policies constrain onboarding, subscriptions, and data usage.
- Release cycles are slower because reviews happen (especially for the first release).
A practical MVP definition is: the smallest set of flows that proves the outcome, plus the minimum production system to ship and learn safely.
A simple MVP scope template (mobile)
You can keep the product definition lightweight, but you must make it testable.
| MVP element | What “good” looks like | How you prove it |
|---|---|---|
| Core user journey | One primary task works end-to-end | Screen recording + acceptance criteria + analytics event trail |
| Identity | Auth is predictable, errors handled | Login/logout tested, token expiry behavior defined |
| Data contract | API requests and failures are explicit | Typed schema, mocked failure modes, contract tests (where feasible) |
| Offline/poor network | App fails gracefully | Airplane mode tests, retry rules, cached read-only states |
| Observability | You can see crashes and key errors | Crash reporting enabled, release version tagging, basic dashboards |
| Release safety | You can ship and roll back | CI builds, signed artifacts, staged rollout plan |
If you want a general MVP checklist, Wolf-Tech has a platform-agnostic version here: Building Apps: MVP Checklist for Faster Launches. For React Native, the key is to make “store readiness” part of the MVP, not an afterthought.
Step 3: Build a thin vertical slice before you scale the feature list
A thin slice is one happy path plus two unhappy paths, built with near-final architecture.
For example:
- Create account
- Complete one core action
- See the result reflected in a list
- Handle a permissions denial
- Handle a network timeout
This slice is where you validate the decisions that are painful to change later:
- Navigation structure and deep link strategy
- API shape and authentication mechanism
- State boundaries (server state vs UI state vs form state)
- Error handling model (global vs local)
- Logging and crash reporting
If your team already uses Wolf-Tech’s React architecture ideas for web, many patterns still apply in React Native (feature boundaries, explicit contracts, predictable state). Their React architecture article is web-focused but conceptually transferable: React Application Architecture: State, Data, and Routing.
Step 4: Put production guardrails in place early
React Native MVPs fail most often because teams cannot ship safely, not because they cannot code UI.
Delivery: CI/CD, environments, and signing
For App Store and Google Play, you will need repeatable builds with correct signing. Treat signing and build automation as part of “definition of done” for the MVP.
Minimum viable delivery system:
- CI builds for every merge to main
- Preview builds (internal distribution) for QA and stakeholders
- Separate environments (at least staging and production)
- Versioning discipline (build numbers, release notes)
- A reproducible way to produce store-ready artifacts
If your organization needs a broader baseline, Wolf-Tech’s CI/CD overview is a good starting point: CI CD Technology: Build, Test, Deploy Faster.
Quality gates: testing that matches mobile risk
You do not need 100 percent coverage, but you do need confidence in your money paths and crash paths.
A pragmatic testing stack for an MVP usually includes:
- Component tests for key UI states
- Integration tests around API modules and data mapping
- A small number of end-to-end tests for the critical journey
- Manual test scripts for device-only risks (permissions, backgrounding, deep links)
Add “failure mode testing” early. Mobile users experience failure constantly (elevators, subways, low battery). Your app should degrade gracefully.
Performance: avoid the classic React Native traps
Most performance problems that users feel are not micro-optimizations, they are product-level choices:
- Rendering too much in lists
- Large images with no sizing discipline
- Chatty APIs and data waterfalls
- Too much work on startup
For MVP, set a few measurable budgets, then protect them:
- Cold start budget (time to first useful screen)
- Largest list scroll smoothness for a typical device tier
- Bundle size and number of blocking network calls on first screen
Even a lightweight performance loop (baseline, change, re-measure) prevents “it got slower somehow” spirals. For broader performance thinking, Wolf-Tech’s systems-oriented approach is relevant: Optimize the Code: High-Impact Fixes Beyond Micro-Optimizing.
Step 5: Prepare App Store and Google Play requirements earlier than you think
Teams frequently lose 2 to 4 weeks near launch because store compliance was treated as paperwork. For many products, it affects UX and architecture.
Store policy is product scope
Examples of store-driven requirements that can change your MVP:
- Data collection disclosures (what you collect, why, and whether it is linked to identity)
- Tracking rules on iOS (if you do cross-app tracking, you will need App Tracking Transparency prompts)
- Subscription rules and what counts as “digital goods”
- User-generated content moderation expectations for some app categories
Use primary sources when you plan:
- Apple: App Store Review Guidelines
- Google Play: Developer Policy Center
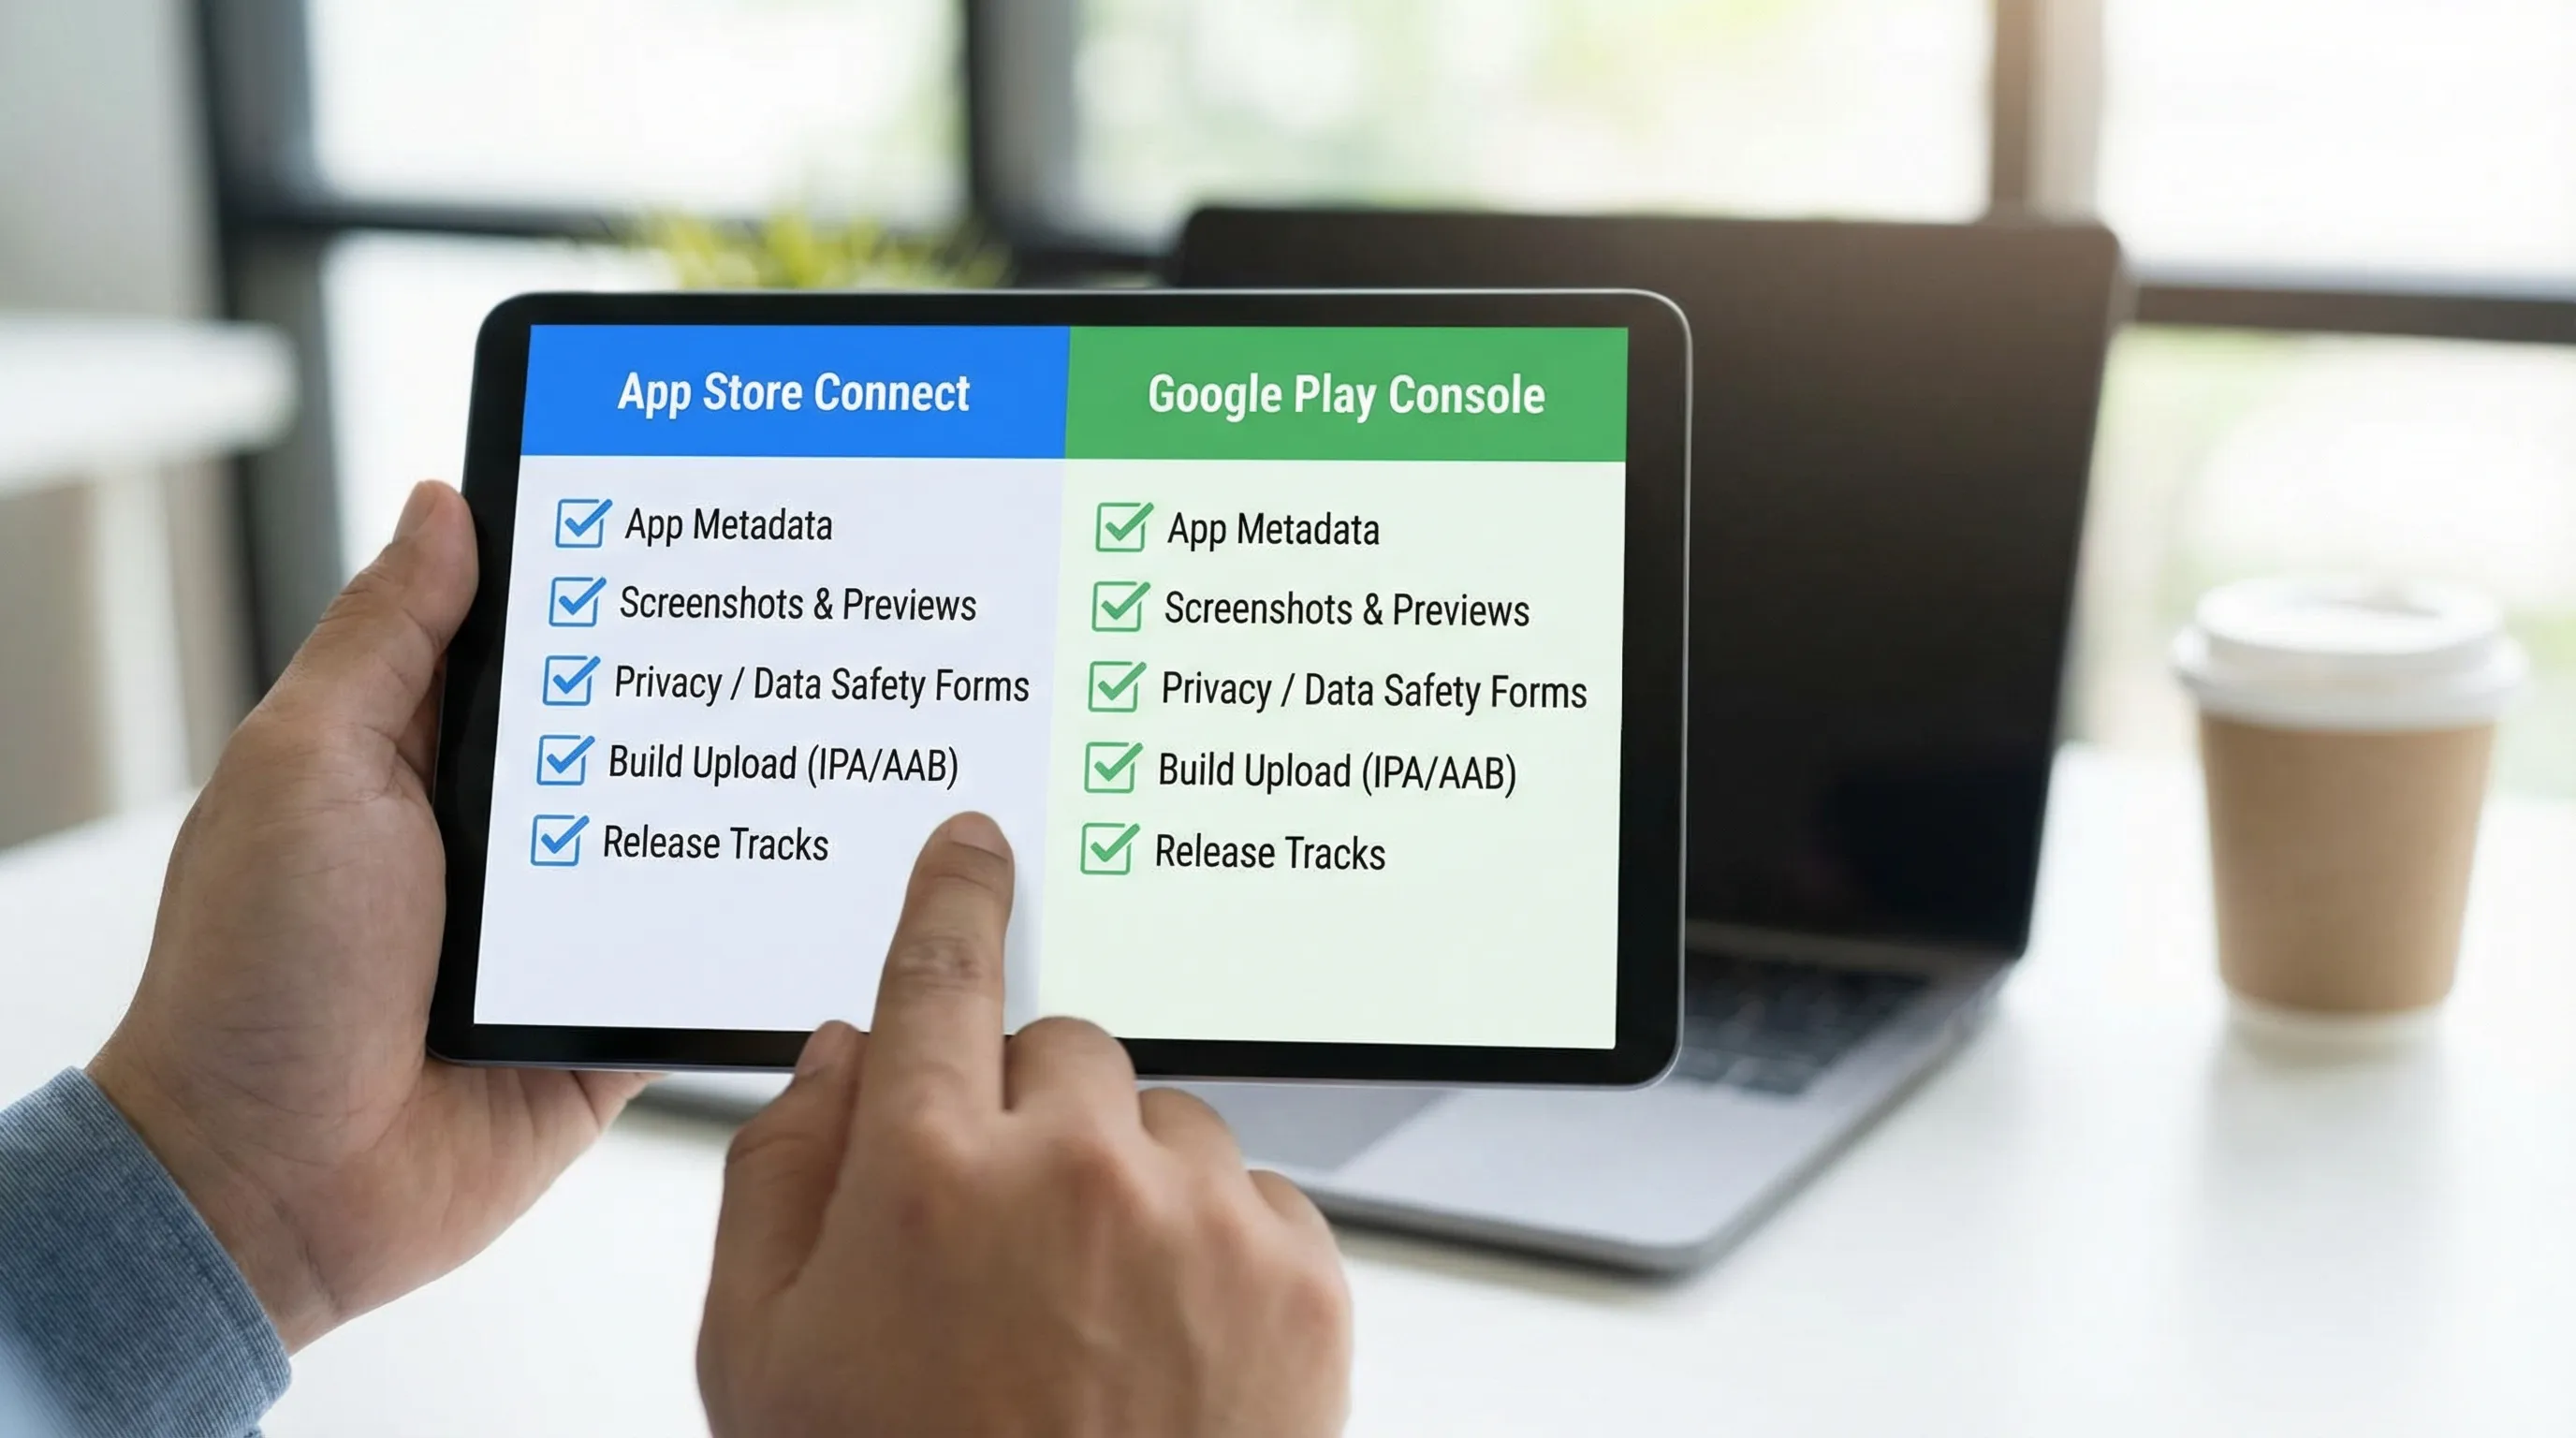
A store-readiness checklist you can actually execute
| Area | iOS (App Store) | Android (Google Play) |
|---|---|---|
| Developer accounts | Apple Developer Program enrollment, App Store Connect access | Google Play Console account, correct org access |
| Signing | Certificates, provisioning profiles, bundle ID | App signing keys, keystore management |
| Privacy declarations | App Privacy “nutrition label”, privacy policy URL | Data Safety section, privacy policy URL |
| Review artifacts | Screenshots, preview, metadata, support URL | Screenshots, feature graphic, metadata |
| Beta distribution | TestFlight setup (TestFlight) | Internal testing, closed/open tracks |
| Release strategy | Phased release if needed, version notes | Staged rollout percentage, track promotion |
| Compliance checks | Permission prompts, account deletion (if applicable), content policies | Permissions, sensitive data handling, target SDK requirements |
Two practical tips that prevent painful rework:
- Write your privacy policy early, even if it is minimal, because it forces clarity on what data exists and why.
- Decide how you will handle account deletion and data deletion requests before launch, because it affects backend and support operations.
Step 6: Ship with a reversible launch plan
Your first release is not a finish line, it is the start of learning with real constraints.
A safe launch plan usually includes:
- Internal build distribution for stakeholders
- A beta cohort with clear feedback channel
- A staged rollout (especially on Google Play)
- Crash and error monitoring with release tags
- A rollback plan that the team has rehearsed
If your app supports critical workflows (health, finance, logistics), define basic production outcomes before day one, such as:
- Crash-free sessions target
- API availability target
- p95 latency targets for key endpoints
- Support response expectations for early users
These are not enterprise “big company” practices. They are the cheapest way to avoid a bad first impression you cannot undo.
Step 7: Post-launch iteration without store-release pain
After launch, the teams that win are the ones that can run a tight loop:
- Measure outcome events
- Diagnose friction points
- Ship improvements weekly (or faster)
React Native makes iteration possible, but you still need discipline:
- Keep dependencies current to avoid painful upgrade cliffs.
- Avoid uncontrolled native sprawl. Every custom native module increases upgrade and debugging cost.
- Treat analytics as contracts. If event names change every sprint, your learning system breaks.
A simple cadence that works well for early-stage products:
- Weekly shipping target (even small)
- Bi-weekly review of metrics and top friction points
- Monthly “quality and operability” day (crash debt, performance regressions, pipeline fixes)
Common MVP-to-store failure modes (and how to avoid them)
“We built the app, now we need to figure out the backend”
Mobile surfaces backend weaknesses immediately: slow endpoints feel worse, flaky auth is fatal, and offline needs show up faster.
Fix: design the MVP as a full-stack slice, with at least one production-grade integration and real error handling.
“App Store review rejected us, and we did not expect it”
Rejections are normal, surprises are not.
Fix: read the relevant guidelines early, and align your onboarding, permissions, and data handling to them. Start with Apple’s App Store Review Guidelines and Google’s Developer Policy Center.
“We cannot reproduce crashes from users”
Without release tagging and crash reporting, you end up guessing.
Fix: enable crash reporting from the first thin slice, tag releases in CI, and capture enough context to debug (device, OS, app version, last screen).
“The MVP got slow as soon as we added the second feature”
This is often an architecture and performance budget problem, not “React Native is slow.”
Fix: set budgets early (startup, list performance), keep shared components disciplined, and avoid doing heavy work on initial render.
When to bring in expert help
React Native is a strong choice when you want a single product team to deliver iOS and Android together, but some situations benefit from experienced guidance:
- You need custom native modules, complex background behavior, or hardware integrations
- You are in a regulated or policy-sensitive space and want fewer review surprises
- You have a legacy backend and need a safe integration plan
- You want an MVP fast, but you also need a foundation that will scale to a real product
Wolf-Tech specializes in full-stack development, code quality consulting, legacy optimization, and delivery systems that let teams ship safely. If you want a pragmatic plan for React Native application development from MVP through App Store and Google Play release, start with a short scoping conversation at wolf-tech.io and align on a thin vertical slice that proves value and operability early.